Search This Blog

Windows 7 connect to WEP encrypted wireless network

WEP is insecure and you should try not to use it. However, in some cases you have to use WEP. (e.g. Mac OS X Lion Internet sharing supports only WEP).

I have a Windows 7 netbook, I want to connect it to the WEP encrypted wireless network created by my Mac book pro (OS X Lion). However, it just failed to connect.
Searched and found the following solution:
  1. Open "Network and Sharing Center".
  2. Select "Set up a new connection or network".
  3. Select "Manually connect to a wireless network".
  4. Enter the network name(ESSID): e.g. WILSON_MBP, and Save
  5. Try connect to the network and enter the WEP key, if it keeps failing to connect, do the following steps:
  6. "Manage Wireless Networks" and Select the network that you just created, open it
  7. Activate "Security" tab, if the Security Type is "No authentication (Open)", change it to "Shared"; if the Security Type is "Shared", change it to "No authentication (Open)".
  8. Now you can connect to the network and re-enter the WEP key.

See Also

Install DevStack on Ubuntu 12.04 LTS Precise: hangs when running stack.sh script

The script hangs on the following line:
instances=`sudo virsh list --all | grep $INSTANCE_NAME_PREFIX | sed "s/.*\($INSTANCE_NAME_PREFIX[0-9a-fA-F]*\).*/\1/g"`

Solution

  • Open a new terminal window, run the following command:
    sudo killall -9 dmidecode

Mac OS X: create a bootable Mountain Lion USB disk

Prerequisites

  1. A USB flash drive with as least 8GB capacity.
  2. Install OS X Mountain Lion.app downloaded from Apple AppStore.(Or the InstallESD.dmg inside the app directory.)

Procedures

  • Method 1: Use Disk Utility
    1. Right click the Install OS X Mountain Lion.app, in the context menu, select "Show Package Contents". In Contents/SharedSupport directory, you can find InstallESD.dmg
    2. Plug in the USB drive an launch Disk Utility, which is in /Applications/Utilities
    3. Select the USB drive in Disk Utility, activate the "Partition" tab,
      1. Partition Layout:1 Partition
      2. Format:Mac OS Extented(Journaled)
      3. Click Options... button, and set partition type to GUID Partition Table
      4. click Apply button to format the USB drive.
    4. Drag InstallESD.dmg into Disk Utitlity and select it.
    5. Activate Restore tab, drag the newly formatted USB drive into Destination field
    6. Click Restore button, it will start restore the image into the USB drive.
    7. NOTE: The whole process will take about half an hour. Right at the end, you might get an error message: "Could Not Restore - Invalid Argument". You can simply ignore it. The image should be restored to the USB drive successfully.
  • Method 2: Use Lion Diskmaker
    1. Make sure your USB disk's partition type is GUID Partition Table, if not, re-partition your USB as described in Method 1 using Disk Utitlity. Otherwise, the disk made by Lion Diskmaker may not be able to boot.
    2. Download and run Lion Diskmaker
    3. Select Install OS X Mountain Lion.app then start making the disk.

Firefox: backup saved passwords

  • Method 1:
    1. Go to your Firefox profile directory.
    2. Copy the following 2 files: key3.db and signons.sqlite to the backup destination.
      cp signons.sqlite key3.db /path/to/backup-dir
  • Method 2:
    1. Install Firefox Addon: Password Exporter
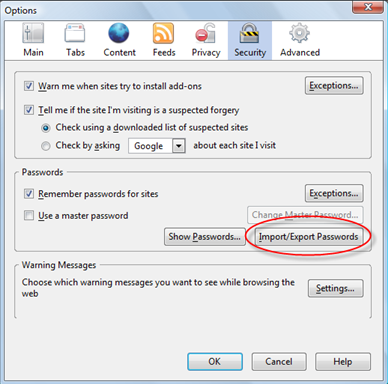
    2. Mac: Firefox -> Preferences -> Security -> Import/Export Passwords
      Windows: Tools -> Options -> Security -> Import/Export Passwords

lsof: list open files

  • List files opened by the user:
    lsof
  • List files opened by the user:
    sudo lsof
  • List all open sockets:
    sudo lsof -i

See also

Mac OS X: disable spotlight on external USB drive

When a USB drive connects to the Mac, the spotlight will try to indexing the files on the drive. To check the activities of the spotlight, run
lsof | grep spotlight
. It might not be the behavior we want. To disable spotlight on the external drive, try the following: The mdutil command can be used to manage spotlight. Run the following command in Terminal:
sudo mdutil -i off /Volumes/USBHD
will turn off spotlight indexing on external drive /Volumes/USBHD.

See also

Office 2011 for Mac: Reset registration key

  1. Remove the following two files:
    rm ~/Library/Preferences/com.microsoft.office.plist
    rm ~/Library/Preferences/Microsoft/Office\ 2011/OLE\ Registration\ Database
    
  2. Restart your Mac
  3. Open any Office application, it will ask for the registration key.

See also

Mac OS: backup and restore Microsoft Office 2011

I. A script to back up Microsoft Office 2011 into a zip file

#!/bin/bash

#
# File name: backup-office2011.sh
#

usage() {
    echo "Usage: $(basename $0) <dest-dir>"
}

if [[ -z $1 || ! -d $1 ]]; then
    echo "Destinated directory is not valid: $1" 1>&2
    usage
    exit
fi

DST=$1

zip -r $DST/MS_OFFICE2011_BACKUP.zip \
       /Applications/Microsoft* \
       /Applications/Remote\ Desktop\ Connection.app \
       /Library/Application\ Support\Microsoft \
       /Library/Automator \
       /Library/Fonts/Microsoft \
       /Library/Fonts\ Disabled \
       /Library/Internet\ Plug-Ins\SharePoint* \
       /Library/LaunchDaemons/com.microsoft.* \
       /Library/Preferences/com.microsoft.* \
       /Library/PrivilegedHelperTools/com.microsoft.* \
       /Library/Receipts/Office2011* \
       $HOME/Library/Application\ Support\Microsoft \
       $HOME/Library/Preferences/com.microsoft* \
       $HOME/Library/Preferences/Microsoft \
       $HOME/Documents/Microsoft\ User\ Data

II. Usage

  • Backup Microsoft Office 2011:
    ./backup-office2011.sh /Volumes/USBDISK/backups/
  • Restore Microsoft Office 2011 from the backup zip:
    cd /; sudo unzip /Volumes/USBDISK/backups/MS_OFFICE2011_BACKUP.zip

See Also

Java: File separator and path separator

File.separatorFile.pathSeparator
Window\;
Unix(Mac, Linux)/:
import java.io.File

public class Test {
    public static void main(String[] args){
         System.out.println(File.separator);
         System.out.println(File.pathSeparator);
    }
}

VLC player: How to enable Broadcom Crystal HD decoder

Broadcom Crystal HD Decoder is an hardware decoder for playing HD videos. It is normally installed on some netbooks to enhance the performance of HD video play.
  1. To utilize the HD decoder, first you need to install its driver.
  2. To enable Broadcom Crystal HD Decoder, you need to download and install the following version of VLC player: http://nightlies.videolan.org/build/win32/backup/branch-20111219-0202/. And you need to add "--codec crystalhd" argument to the VLC Player command(shortcut).
  3. After installed the above, you can run C:\Program Files\Broadcom\Broadcom CrystalHD Decoder/DTS_Info.exe, it will show an icon in system tray. When a HD video is be played and the Crystal HD decoder is being utilized, the icon will be changed/flashing.

See also

Samsung n220 netbook: How to enable Broadcom BCM70015 crystal HD decoder

  1. Install Broadcom Crystal HD Decoder drivers
  2. Install K-lite Codec Pack Standard (with Media Player Classic Home Cinema). During the installation select System default for the H.264 decoder
  3. To check if the HD decoder is used:
    • run "C:/Program Files/Broadcom/Broadcom CrystalHD Decoder/DTS_Info.exe", it will start as an icon in system tray.
    • Open and play a HD video using Media Player classic, you should be able to see the DTS_info icon is flashing if the crystal HD decoder is being used by the player.

Install TWiki on Ubuntu 12.04 Precise LTS

  1. Install Apache 2 and other required packages:
    sudo apt-get install apache2 libgdal-perl libcgi-session-perl libhtml-tree-perl liberror-perl libfreezethaw-perl libgd2-xpm rcs
  2. Download TWiki-5.1.2.tgz from http://twiki.org/cgi-bin/view/Codev/DownloadTWiki
  3. Install TWiki-5.1.2:
     
        cd /var/www
        tar -zxvf /path/to/TWiki-5.1.2.tgz
        chown -R www-data:www-data /var/www/twiki
        cp /var/www/twiki/bin/LocalLib.cfg.txt /var/www/twiki/bin/LocalLib.cfg
      
  4. Configure TWiki in Apache 2:
    • Go to http://twiki.org/cgi-bin/view/TWiki/ApacheConfigGenerator to generate your twiki configuration file online
    • save the generated configuration to /etc/apache2/conf.d/twiki.conf
    • Here is my twiki.conf:
      # Autogenerated httpd.conf file for TWiki.
      # Generated at http://twiki.org/cgi-bin/view/TWiki/ApacheConfigGenerator
      
      # We set an environment variable called blockAccess.
      #
      # Setting a BrowserMatchNoCase to ^$ is important. It prevents TWiki from
      # including its own topics as URLs and also prevents other TWikis from
      # doing the same. This is important to prevent the most obvious
      # Denial of Service attacks.
      #
      # You can expand this by adding more BrowserMatchNoCase statements to
      # block evil browser agents trying the impossible task of mirroring a twiki
      #
      # Example:
      # BrowserMatchNoCase ^SiteSucker blockAccess
      # BrowserMatchNoCase ^$ blockAccess
      
      BrowserMatchNoCase ^Accoona blockAccess
      BrowserMatchNoCase ^ActiveAgent blockAccess
      BrowserMatchNoCase ^Attache blockAccess
      BrowserMatchNoCase BecomeBot blockAccess
      BrowserMatchNoCase ^bot blockAccess
      BrowserMatchNoCase Charlotte/ blockAccess
      BrowserMatchNoCase ^ConveraCrawler blockAccess
      BrowserMatchNoCase ^CrownPeak-HttpAgent blockAccess
      BrowserMatchNoCase ^EmailCollector blockAccess
      BrowserMatchNoCase ^EmailSiphon blockAccess
      BrowserMatchNoCase ^e-SocietyRobot blockAccess
      BrowserMatchNoCase ^Exabot blockAccess
      BrowserMatchNoCase ^FAST blockAccess
      BrowserMatchNoCase ^FDM blockAccess
      BrowserMatchNoCase ^GetRight/6.0a blockAccess
      BrowserMatchNoCase ^GetWebPics blockAccess
      BrowserMatchNoCase ^Gigabot blockAccess
      BrowserMatchNoCase ^gonzo1 blockAccess
      BrowserMatchNoCase ^Google\sSpider blockAccess
      BrowserMatchNoCase ^ichiro blockAccess
      BrowserMatchNoCase ^ie_crawler blockAccess
      BrowserMatchNoCase ^iGetter blockAccess
      BrowserMatchNoCase ^IRLbot blockAccess
      BrowserMatchNoCase Jakarta blockAccess
      BrowserMatchNoCase ^Java blockAccess
      BrowserMatchNoCase ^KrakSpider blockAccess
      BrowserMatchNoCase ^larbin blockAccess
      BrowserMatchNoCase ^LeechGet blockAccess
      BrowserMatchNoCase ^LinkWalker blockAccess
      BrowserMatchNoCase ^Lsearch blockAccess
      BrowserMatchNoCase ^Microsoft blockAccess
      BrowserMatchNoCase ^MJ12bot blockAccess
      BrowserMatchNoCase MSIECrawler blockAccess
      BrowserMatchNoCase ^MSRBOT blockAccess
      BrowserMatchNoCase ^noxtrumbot blockAccess
      BrowserMatchNoCase ^NutchCVS blockAccess
      BrowserMatchNoCase ^RealDownload blockAccess
      BrowserMatchNoCase ^Rome blockAccess
      BrowserMatchNoCase ^Roverbot blockAccess
      BrowserMatchNoCase ^schibstedsokbot blockAccess
      BrowserMatchNoCase ^Seekbot blockAccess
      BrowserMatchNoCase ^SiteSnagger blockAccess
      BrowserMatchNoCase ^SiteSucker blockAccess
      BrowserMatchNoCase ^Snapbot blockAccess
      BrowserMatchNoCase ^sogou blockAccess
      BrowserMatchNoCase ^SpiderKU blockAccess
      BrowserMatchNoCase ^SpiderMan blockAccess
      BrowserMatchNoCase ^Squid blockAccess
      BrowserMatchNoCase ^Teleport blockAccess
      BrowserMatchNoCase ^User-Agent\: blockAccess
      BrowserMatchNoCase VoilaBot blockAccess
      BrowserMatchNoCase ^voyager blockAccess
      BrowserMatchNoCase ^W3C blockAccess
      BrowserMatchNoCase ^w3search blockAccess
      BrowserMatchNoCase ^Web\sDownloader blockAccess
      BrowserMatchNoCase ^WebCopier blockAccess
      BrowserMatchNoCase ^WebDevil blockAccess
      BrowserMatchNoCase ^WebSec blockAccess
      BrowserMatchNoCase ^WebVac blockAccess
      BrowserMatchNoCase ^Webwhacker blockAccess
      BrowserMatchNoCase ^Webzip blockAccess
      BrowserMatchNoCase ^Wells blockAccess
      BrowserMatchNoCase ^WhoWhere blockAccess
      BrowserMatchNoCase www\.netforex\.org blockAccess
      BrowserMatchNoCase ^WX_mail blockAccess
      BrowserMatchNoCase ^yacybot blockAccess
      BrowserMatchNoCase ^ZIBB blockAccess
      BrowserMatchNoCase ^$ blockAccess
      
      <IfModule mod_perl.c>
          # Mod_perl preloading
          PerlSwitches -T
      </IfModule>
      
      # The ScriptAlias defines the bin directory as a directory where CGI
      # scripts are allowed.
      # The first parameter will be part of the URL to your installation e.g.
      # http://example.com/do/view/...
      # The second parameter must point to the physical path on your disc.
      ScriptAlias /twiki/bin "/var/www/twiki/bin"
      
      # The Alias defines a url that points to the twiki pub directory, which
      # is the root of file attachments.
      Alias /twiki/pub "/var/www/twiki/pub"
      
      Alias /twiki "/var/www/twiki/bin/view"
      
      # Block access to typical spam related attachments
      # Except the TWiki directory which is read only and does have attached html files.
      SetEnvIf Request_URI "/pub/.*\.[hH][tT][mM][lL]?$" blockAccess
      SetEnvIf Request_URI "/pub/TWiki/.*\.[hH][tT][mM][lL]?$" !blockAccess
      
      # This specifies the options on the TWiki scripts directory. The ExecCGI
      # and SetHandler tell apache that it contains scripts. "Allow from all"
      # lets any IP address access this URL.
      <Directory "/var/www/twiki/bin">
          AllowOverride None
          Order Allow,Deny
          Allow from all
          Deny from env=blockAccess
      
          Options ExecCGI FollowSymLinks
          SetHandler cgi-script
      
          # Password file for TWiki users
          AuthUserFile /var/www/twiki/data/.htpasswd
          AuthName 'Enter your WikiName: (First name and last name, no space, no dots, capitalized, e.g. JohnSmith)'
          AuthType Basic
      
          # File to return on access control error (e.g. wrong password)
          ErrorDocument 401 /bin/view/TWiki/TWikiRegistration
      
      
      # When using Apache type login the following defines the TWiki scripts
      # that makes Apache ask the browser to authenticate. It is correct that
      # scripts such as view are not authenticated.
      <FilesMatch "(attach|edit|manage|rename|save|upload|mail|logon|rest|.*auth).*">
         require valid-user
      </FilesMatch>
      
      
      </Directory>
      
      # This sets the options on the pub directory, which contains attachments and
      # other files like CSS stylesheets and icons. AllowOverride None stops a
      # user installing a .htaccess file that overrides these options.
      # Note that files in pub are *not* protected by TWiki Access Controls,
      # so if you want to control access to files attached to topics you need to
      # block access to the specific directories same way as the ApacheConfigGenerator
      # blocks access to the pub directory of the Trash web
      <Directory "/var/www/twiki/pub">
          Options None
          AllowOverride None
          Order Allow,Deny
          Allow from all
          Deny from env=blockAccess
      
          # Disable execusion of PHP scripts
          php_admin_flag engine off
      
          # This line will redefine the mime type for the most common types of scripts
          AddType text/plain .shtml .php .php3 .phtml .phtm .pl .py .cgi
      
      #add an Expires header that is sufficiently in the future that the browser does not even ask if its uptodate
      # reducing the load on the server significantly
      #IF you can, you should enable this - it _will_ improve your twiki experience, even if you set it to under one day.
      # you may need to enable expires_module in your main apache config
      #LoadModule expires_module libexec/httpd/mod_expires.so
      #AddModule mod_expires.c
      #<ifmodule mod_expires.c>
      #  <filesmatch "\.(jpg|gif|png|css|js)$">
      #       ExpiresActive on
      #       ExpiresDefault "access plus 11 days"
      #   </filesmatch>
      #</ifmodule>
      
      </Directory>
      
      # Spammers are known to attach their stuff and then move it to trash where it remains unnoticed.
      # We prevent viewing any attachments directly from pub
      <Directory "/var/www/twiki/pub/Trash">
         deny from all
      </Directory>
      
    • Allow configure TWiki from local ip (and/or remote admin hosts) by adding following to /etc/apache2/conf.d/twiki.conf:
      <FilesMatch "^configure.*">
             SetHandler cgi-script
             Order Deny,Allow
             Deny from all
             Allow from 127.0.0.1,192.168.20.8,192.168.20.11
      </FilesMatch>
      
  5. Reload Apache 2:
    sudo /etc/init.d/apache2 reload
  6. Edit /var/www/twiki/bin/LocalLib.cfg:
    $twikiLibPath = "/var/www/twiki/lib";
  7. Configure your twiki: go to http://yourtwikihost.org/twiki/bin/configure,  setup admin password and paths, save it.
  8. Add following line to /var/www/twiki/lib/LocalSite.cfg (DO NOT append to the very end of the file)
    $TWiki::cfg{ScriptUrlPaths}{view} = '';
    
    to short view action so that /twiki/view/WikiWord can be shorten to /twiki/WikiWord

See also

Apache 2: Symbolic link not allowed or link target not accessible

While I was setting up Apache 2 on Ubuntu Linux, I want to change the default DocumentRoot from /var/www to /store/services/www, my site configuration is below:
        DocumentRoot /store/services/www
        <Directory />
                Options FollowSymLinks
                AllowOverride None
        </Directory>
        <Directory /store/services/www/>
                Options -Indexes FollowSymLinks MultiViews
                AllowOverride None
                Order allow,deny
                allow from all
        </Directory>
When accessing the web page, got permission error. Also see error in /var/log/apache2/error.log:
[Sat Dec 08 22:40:41 2012] [error] [client 192.168.20.11] Symbolic link not allowed or link target not accessible: /var/www

The problem:

Struggle for a few minutes, found what the problem is: Apache needs read & execute permissions to not only the target directory, but it needs rx permissions to all the way through until reaching the target directory. For example, in the configuration above, we have the target directory /store/services/www, we need to set the permission of all the parent folders so that the apache user(e.g www-data) have at least read & execute permission.

The solution:

sudo chmod 755 /store
sudo chmod 755 /store/services
sudo chown -R www-data:www-data /store/services/www

Mac OS X: create a zip archive excludes .DS_Store files

zip -x "*.DS_Store" -r foo.zip foo/


See also

Mac OS X: create/extract split zip archives

I. Create split zip archive

  • To create a split zip archive (a series of files named zip, z01, z02...), run following command in Terminal:
    zip -s 100m -x "*.DS_Store" -r split-foo.zip foo/

II. Extract split zip archive

  • To extract a split zip archive (a series of files named zip, z01, z01...), run following command in Terminal:
    1. First, combine the split archive to a single archive:
      zip -s 0 split-foo.zip --out unsplit-foo.zip
    2. Extract the single archive using unzip:
      unzip unsplit-foo.zip

See also

Ubuntu 12.04 Precise: Install Java 7

Install Java 7

sudo apt-get install python-software-properties
sudo add-apt-repository ppa:webupd8team/java
sudo apt-get update
sudo apt-get install oracle-java7-installer
sudo update-java-alternatives -s java-7-oracle

Uninstall Java 7

sudo apt-get remove oracle-java7-installer

See also

How to build Google Web Toolkit DevMode plugin for Firefox 17.0 on Mac OS X

  1. Install XCode if you do not have it. (XCode 3.2.6 is recommended for building this plugin, because the source code is configured to used Mac OS 10.5 sdk, which is included in XCode 3.2.6, but it is dropped by later version XCodes. However, the later version e.g. xcode 4.3, can also be used with a few modifications on the configuration.)
  2. Check out the source code:
        svn checkout http://google-web-toolkit.googlecode.com/svn/trunk/plugins gwt/plugins
        svn checkout http://google-web-toolkit.googlecode.com/svn/plugin-sdks/gecko-sdks/gecko-17.0.0 plugin-sdks/gecko-sdks/gecko-17.0.0
      
  3. If you have xcode 3.2.6 installed, you can try to build it:
    cd gwt/plugins/xpcom && make BROWSER=ff170
  4. If you have later xcode version, e.g. xcode 4.3, installed, the command above will fail with errors finding cstdio.h. To make it work, you need to
    1. modify plugins/config.mk,
      vi ../config.mk
      change
      BASECFLAGS= $(DEBUGCFLAGS) -O2 -fPIC $(INC) -D__mac -mmacosx-version-min=10.5 -isysroot /Developer/SDKs/MacOSX10.5.sdk -std=c++11
      to
      BASECFLAGS= $(DEBUGCFLAGS) -O2 -fPIC $(INC) -D__mac -mmacosx-version-min=10.7 -isysroot /Applications/Xcode.app/Contents/Developer/Platforms/MacOSX.platform/Developer/SDKs/MacOSX10.7.sdk -std=c++11
    2. modify gwt/plugins/xpcom/Makefile,
      vi Makefile
      change
      DLLFLAGS += -bundle $(ALLARCHCFLAGS) -mmacosx-version-min=10.5  -isysroot /Developer/SDKs/MacOSX10.5.sdk
      to
      DLLFLAGS += -bundle $(ALLARCHCFLAGS) -mmacosx-version-min=10.7  -isysroot /Applications/Xcode.app/Contents/Developer/Platforms/MacOSX.platform/Developer/SDKs/MacOSX10.7.sdk
  5. run
    make BROWSER=ff170
    (in gwt/plugins/xpcom directory.) to build.
  6. the result plugin file will be gwt/plugins/xpcom/prebuilt/wt-dev-plugin.xpi

Install XCode 3.2.6 on Mac OS X 10.7 Lion

I was trying to compile GWT DevMode Plugin for Firefox on Mac OS, found the source code is configured to use mac os 10.5 sdk, which is included in xcode 3.2.6 but dropped by the later versions of xcode. The follow steps are what I did to install xcode 3.2.6 on Mac OS X 10.7 Lion:
  1. Download XCode 3.2.6 from https://developer.apple.com/downloads. (You need to sign up and login.)
  2. Mount xcode_3.2.6_and_ios_sdk_4.3.dmg
  3. Open /Applications/Utilities/Terminal.app and run the following command:
    export COMMAND_LINE_INSTALL=1; open "/Volumes/Xcode and iOS SDK/Xcode and iOS SDK.mpkg"

GWT Developer's Plugin for Firefox 17

Update

The latest official google gwt devmode plugin for firefox has been updated to support Firefox 17. Upgrading to Firefox 17 should automatically update the gwt plugin as well.


See also

Ubuntu 12.04 Precise LTS: Install ModEvasive for Apache 2 web server

  1. sudo apt-get install libapache2-mod-evasive
  2. sudo mkdir /var/log/mod_evasive; sudo chown -R www-data:www-data /var/log/mod_evasive
  3. sudo vi /etc/apache2/mods-available/mod-evasive.conf
    <ifmodule mod_evasive20.c>
       DOSHashTableSize 3097
       DOSPageCount  2
       DOSSiteCount  50
       DOSPageInterval 1
       DOSSiteInterval  1
       DOSBlockingPeriod  10
       DOSLogDir   /var/log/mod_evasive
       DOSEmailNotify  EMAIL@DOMAIN.com
       DOSWhitelist   127.0.0.1
    </ifmodule>
  4. sudo a2enmod mod-evasive; sudo /etc/init.d/apache2 restart

Ubuntu 12.04 Precise LTS: Install ModSecurity for Apache 2 web server

  1. Install ModSecurity:
     sudo apt-get install libxml2 libxml2-dev libxml2-utils libaprutil1 libaprutil1-dev libapache-mod-security
    If your Ubuntu is 64bit, you need to fix a bug:
    sudo ln -s /usr/lib/x86_64-linux-gnu/libxml2.so.2 /usr/lib/libxml2.so.2
  2. Configure ModSecurity:
    sudo mv /etc/modsecurity/modsecurity.conf-recommended /etc/modsecurity/modsecurity.conf; sudo vi /etc/modsecurity/modsecurity.conf
        
    Enable the rule engine:
    SecRuleEngine On
    Increase the request body size limit to 10Mb(Optional, only if your site accepts uploads):
    SecRequestBodyLimit 10000000
    SecRequestBodyInMemoryLimit 10000000
  3. Check the ModSecurity version:
    dpkg -s libapache-mod-security | grep Version
    The installed ModSecurity version is:
    Version: 2.6.3-1ubuntu0.2
  4. Install OWASP ModSecurity Core Rule Set:
    1. Download the rule set(version 2.2.5 because the latest version requires ModSecurity 2.7.0+):
      wget https://github.com/SpiderLabs/owasp-modsecurity-crs/tarball/v2.2.5 -O /tmp/owasp.tar.gz
    2. Extract the package:
      cd /tmp; tar -zxvf owasp.tar.gz; rm owasp.tar.gz
    3. Copy the directory to /etc/modsecurity, and set the permissions:
      sudo mv SpiderLabs-owasp-modsecurity-crs-5c28b52/ /etc/modsecurity/owasp-crs
      sudo chmod -R 644 /etc/modsecurity/owasp-crs
    4. Link the rules to /etc/modsecruity/owasp-crs/activated_rules directory:
      sudo mv /etc/modsecurity/owasp-crs/modsecurity_crs_10_setup.conf.example /etc/modsecurity/owasp-crs/modsecurity_crs_10_setup.conf
      cd /etc/modsecurity/owasp-crs/activated_rules/
      sudo ln -s ../modsecurity_crs_10_setup.conf
      for f in $(ls ../base_rules/); do sudo ln -s ../base_rules/$f; done
      for f in $(ls ../optional_rules/); do sudo ln -s ../optional_rules/$f; done
    5. Modify /etc/apache2/mods-available/mod-security.conf to include the rules:
      sudo vi /etc/apache2/mods-available/mod-security.conf
      Add the following line:
      Include "/etc/modsecurity/owasp-crs/activated_rules/*.conf"
    6. Enable headers module:
      sudo a2enmod headers
      This to fix the following error:
      Syntax error on line 29 of /etc/apache2/conf.d/modsecurity/optional_rules/modsecurity_crs_49_header_tagging.conf:
      Invalid command 'RequestHeader', perhaps misspelled or defined by a module not included in the server configuration
      Action 'configtest' failed.
      The Apache error log may have more information.
         ...fail!
      when restarting apache2.
  5. Enable ModSecurity module and restart apache2:
    sudo a2enmod mod-security; sudo /etc/init.d/apache2 restart

See also

Mac OS: ssh tunnel issue 'bind: Cannot assign requested address'

I was trying to make a ssh tunnel using the following command:
ssh -L 127.0.0.1:8000:remotehost.mycompany.com:3128 wilson@gateway.mycompany.com -f -N
It gives an error: "bind: Cannot assign requested address"
Check the System Preferences -> Security & Privacy, found Firewall is On and in Firewall Options, Blocking all incoming connections was ticked. Deselect it and retry the ssh command, it works fine.

Mac OS: commands to find my computer's ip address

ifconfig | grep "inet " | grep -v 127.0.0.1 | awk '{print $2}'

Get the pid of a command running background

sleep 100 &
echo $!
Note: $! holds the pid of the command.

Run SSH Tunnel in background

I. start the tunnel in background

To open a SSH tunnel (port forwarding) in background, the following options for ssh command will be used:
  • -L [bind_address:]port:host:hostport
    • Specifies that the given port on the local (client) host is to be forwarded to the given host and port on the remote side.  This works by allocating a socket to listen to port on the local side, optionally bound to the specified bind_address.  Whenever a connection is made to this port, the connection is forwarded over the secure channel, and a connection is made to host port hostport from the remote machine.
  • -N
    • Do not execute a remote command.  This is useful for just forwarding ports (protocol version 2 only).
  • -f 
    • Requests ssh to go to background just before command execution.

Suppose I want to access the intranet site at work from home, and I have ssh access to the gateway host at work.

ssh -L 127.0.0.1:8000:intranet.mycompany.com:80 wilson@gateway.mycompany.com -f -N
The command above will start the tunnel (and the ssh process is running)in background.

II. kill the ssh process running in background

To kill the ssh process running in background, we can run ps aux to find the pid but that is not an elegant solution. ssh has -M -S and -O options to control the ssh process. It is ideal for this purpose.
  • -M 
    • Places the ssh client into "master" mode for connection sharing.
  • -S ctl_path 
    •  Specifies the location of a control socket for connection sharing, or the string ``none'' to disable connection sharing. Refer to the description of ControlPath and ControlMaster in ssh_config(5) for details.
  • -O ctl_cmd 
    • Control an active connection multiplexing master process. When the -O option is specified, the ctl_cmd argument is interpreted and passed to the master process. Valid commands are: ``check'' (check that the master process is running), ``forward'' (request forwardings without command execution) and ``exit'' (request the master to exit).

# starts the tunnel
ssh -L 127.0.0.1:8000:intranet.mycompany.com:80 -f -N -M -S ~/.ssh-tunnel.gateway.mycompany.com wilson@gateway.mycompany.com

# checks the ssh process (pid)
ssh -S ~/.ssh-tunnel.gateway.mycompany.com -O check wilson@gateway.mycompany.com

# exits the ssh process (stops the tunnel)
ssh -S ~/.ssh-tunnel.gateway.mycompany.com -O exit wilson@gateway.mycompany.com

III. A example shell script

The following shell script (Tested on Mac OS X) starts the ssh tunnel in background, then open the intranet web site, when the browser application is closed, it stops the ssh tunnel.
#!/bin/bash

GATEWAY_HOST=gateway.mycompany.com

GATEWAY_USER=wilson

REMOTE_HOST=172.23.33.10

REMOTE_PORT=80

LOCAL_HOST=$(ifconfig | grep "inet " | grep -v 127.0.0.1 | awk '{print $2}')

LOCAL_PORT=8000

SSH_CTRL_PATH=~/.ssh-tunnel-${GATEWAY_HOST}

ssh -L ${LOCAL_HOST}:${LOCAL_PORT}:${REMOTE_HOST}:${REMOTE_PORT} ${GATEWAY_USER}@${GATEWAY_HOST} -N -f -M -S ${SSH_CTRL_PATH}

open -W http://${LOCAL_HOST}:${LOCAL_PORT}/

ssh -S ${SSH_CTRL_PATH} -O exit ${GATEWAY_USER}@${GATEWAY_HOST}

See also
Java: convert between List and Array

I. List to Array

List<String> list = new ArrayList<String>(Arrays.asList(new String[]{"Mercury", "Venus", "Earth", "Mars", "Jupiter", "Saturn", "Uranus"})); 
// NOTE: the following line can be 
// String[] array = list.toArray(new String[0]);
String[] array = list.toArray(new String[list.size()]);

II.Array to List

String[] array = new String[]{"Mercury", "Venus", "Earth", "Mars", "Jupiter", "Saturn", "Uranus"};
List<String> list = Arrays.asList(array);

III. A complete example

package arc;

import java.util.Arrays;
import java.util.List;

public class Test {

 public static void main(String[] args) {
  String[] array = new String[] { "Mercury", "Venus", "Earth", "Mars", "Jupiter", "Saturn", "Uranus" };
  for (String a : array) {
   System.out.println(a);
  }
  
  List<String> list = toList(array);
  System.out.println(list);
  
  array = toArray(list);
  for (String a : array) {
   System.out.println(a);
  }
 }

 public static String[] toArray(List<String> list) {
  return list.toArray(new String[0]);
 }

 public static List<String> toList(String[] array) {
  return Arrays.asList(array);
 }

}

NOTE

list.toArray(new String[0]) is ok because the method will create a new array with the actual size of the list and returns it.

Java: get disk usage of a file or directory

  • Option 1:
    import java.io.File;
    
    public class FileUtil {
    
     public static long getDiskUsage(File f) {
      if (f.isFile()) {
       return f.length();
      } else {
       int total = 0;
       File[] fs = f.listFiles();
       if (fs != null) {
        for (int i = 0; i < fs.length; i++) {
         total += getDiskUsage(fs[i]);
        }
       }
       return total;
      }
    
     }
    
     public static void main(String[] args) {
      System.out.println(getDiskUsage(new File("/tmp/1.png")));
     }
    }
    
  • Option 2:
    import java.io.File;
    import java.io.FileFilter;
    
    public class DiskUsage implements FileFilter {
    
     private long _size = 0;
    
     public DiskUsage() {
    
     }
    
     @Override
     public boolean accept(File file) {
      if (file.isFile()) {
       _size += file.length();
      } else {
       file.listFiles(this);
      }
      return false;
     }
    
     public long getSize() {
      return _size;
     }
    
     public static void main(String[] args) {
      DiskUsage du = new DiskUsage();
      du.accept(new File("/tmp/1.png"));
      System.out.println(du.getSize());
     }
    }
    

Stock Android SIP client set up

Native SIP clients available on some 2.3/4.0 phones. To enable it:

  1. Settings -> Internet call settings
  2. Click Accounts, then click "Add account" button
    • User Name: 888XXXXXXX (Your VOIP account number given by you VOIP service provider)
    • Password: XXXXX (Your VOIP password)
    • Server: sip.pennytel.com (Your VSP's sip server)
    • Tick set as primary account
Now you should be able to make calls through your VOIP if WIFI is enabled. (VOIP via 3G is disabled.)

Mac OS: How to use Java 6 after installed Oracle Java 7

Append the following command to your ~/.bashrc file (if you are using bash:
export JAVA_HOME=`/usr/libexec/java_home -v 1.6`

See also

Re-enable Apple's Java 6 applet plugin after applying Apple's Java Mac OS X 2012-006 Update

  1. Open Terminal, located in the Utilities folder.Enter this command, then press the Return or Enter key:
    sudo mkdir -p /Library/Internet\ Plug-Ins/disabled
  2. Enter this command, then press the Return or Enter key:
    sudo mv /Library/Internet\ Plug-Ins/JavaAppletPlugin.plugin /Library/Internet\ Plug-Ins/disabled
  3. Enter this command, then press the Return or Enter key:
    sudo ln -sf /System/Library/Java/Support/Deploy.bundle/Contents/Resources/JavaPlugin2_NPAPI.plugin /Library/Internet\ Plug-Ins/JavaAppletPlugin.plugin
  4. To re-enable Java SE 6 Web Start, enter this command, then press the Return or Enter key:
    sudo ln -sf /System/Library/Frameworks/JavaVM.framework/Commands/javaws /usr/bin/javaws

To disable Java SE 6 Web Start opening

Enter this command, then press the Return or Enter key:
sudo ln -sf /System/Library/Frameworks/JavaVM.framework/Versions/Current/Commands/javaws /usr/bin/javaws
When prompted, enter your administrator password, then press the Return or Enter key.

To re-enable the Java 7 applet plug-in

Download and re-install the Oracle Java 7 JRE from this website: http://www.oracle.com/technetwork/java/javase/downloads/jre7-downloads-1637588.html.

Eclipse on Mac OS: Use specific Java VM instead of the platform default version

After apply Apple's Java Mac OS X 2012-006 Update, it remove java plugin for browsers therefore the java applet and webstart applications no longer work. I downloaded Java 7 from Oracle. However, I wants my Eclipse use Java 6: To specify the Java VM for eclipse, you can edit the file: /Applications/eclipse/Eclipse.app/Contents/Info.plist

<key>Eclipse</key>
    <array>
         <string>-vm</string><string>/System/Library/Frameworks/JavaVM.framework/Versions/1.6.0/Commands/java</string>
    ... ... ... ... ...
    </array>

Melbourne Home Visiting Doctors

http://www.mmds.com.au/home-visiting-doctor

When can I request a home visiting doctor?
Weekdays: From 4.00 pm to 8.00 am the next day (overnight)
Weekends: From 10.00 am Saturday until 8.00 am Monday
Public holidays: 24 hours
Please ring your own GP during surgery hours.
If your own GP is available after hours, we will contact him/her for you.
Booking a home visit is easy, either
1. Simply download our free mobile app, enter the patients details and submit the request. Save yourself the cost of a mobile call and possibly waiting on hold. One of our trained, friendly operators will call back quickly to confirm the request, or
2. Phone (03) 9429 5677. Your call will be triaged by our operator and request the following patient details:
  • Full name, date of birth and address for the doctor to attend
  • The patients regular GP. Please provide the clinics name and phone number. At the end of the consultation, a clinical record will be sent to your GP.

Special HTML codes for math symbols

Display Friendly Code Numerical Code Hex Code Description
&#8722; &#x2212; Minus Sign
+ + &#43; &#x2B; Plus Sign
± &plusmn; &#177; &#xB1; Plus or Minus Sign
× &times; &#215; &#xD7; Multiplication Sign
÷ &divide; &#247; &#xF7; Division Sign
% % &#37; &#x25; Percent Sign
&#137; &#x2030; Per Mille Sign (per thousand)
= = &#61; &#x3D; Equal Sign
&#8800; &#x2260; Not Equal To Sign
&#8776; &#x2248; Approximately Equal Sign
&#8801; &#x2261; Identical To Sign
< &lt; &#60; &#x3C; Less Than Sign
> &gt; &#62; &#x3E; Greater Than Sign
&#8804; &#x2264; Less Than or Equal To Sign
&#8805; &#x2265; Greater Than or Equal To Sign
&#8734; &#x221E; Infinity Sign
&#8539; &#x215B; One Eighth Fraction
¼ &frac14; &#188; &#xBC; One Quarter Fraction
&#8540; &#x215C; Three Eighths Fraction
½ &frac12; &#189; &#xBD; One Half Fraction
&#8541; &#x215D; Five Eighths Fraction
¾ &frac34; &#190; &#xBE; Three Quarters Fraction
&#8542; &#x215E; Seven Eighths Fraction
&#8747; &#x222B; Integral Sign
&#8706; &#x2202; Partial Differential Sign
&#8710; &#x2206; Increment Sign
&#8719; &#x220F; N-ary Product Sign
&#8721; &#x2211; N-ary Sum Sign
&#8730; &#x221A; Square Root Sign
&#8735; &#x221F; Right Angle Sign
&#8745; &#x2229; Intersection Sign
&#8729; &#x2219; Bullet Operator
ƒ &#131; &#x83; Function Sign
&#8260; &#x2044; Fraction Slash

六年级小学生王乐乐的感人情书

当我在5.12只想拉着你手跑的时候,我就晓得,我这辈子当不了英雄的哈。

因为我不像那个啥子小英雄林浩那样,在那么害怕的时候还能想着别人,而我,只晓得往外头跑,只拉了你。

你就要去北京了,成都比起北京来说,太小了,楼没得那么高,车没得那么多,人没得那么挤,但感情也没得那么深。

你走了,我没什么好送给你,河边也捡不到像心一样的石头,我没得网银,所以上不了淘宝去买,表姐一天就晓得打游戏,这个忙都不帮我。

你成了我最熟悉的 四川话说的最好的北京人了,至少你屋头的户口本上是这样的,至少你考试的分数线是这样。你就像凤凰一样飞了撒,我很难受,一个暑假都好难受,没精打采的。付胖子经常装着不认识我,指着我对别人说“那个人好奇怪耶,看起来好像一条狗。”

你走了,有些事情不会变的撒,我还是得去读书,去吃东西,我还是会去广福桥吃冒菜,还是得去读书,去吃东西。我还是会点两个人吃的量,虽然有点多,但总有一天会吃完,因为会习惯没有你,因为我会长大。

你走了,我也会变,我会练字,我就是我自己的手机毒霸,管好我自己,少做傻事情的哈。其实聪明人也可以很听话的,至少在没有长大以前。

问你能不能不跟到你爸爸切北京啊,“我不切,一个人在成都你养我”,“我养你啊”,哎,想到就心酸,等着吧。

好了,我不写了。你要好好的,要切煮饭了。成都天气也凉了,北京也一样吧。多穿衣服,多喝热水好了。我们就到这。

以后再遇到起:

好久不见。
你好吗?
我很好!


The life cycle of software development


http://www.projectcartoon.com/

Python: call piped commands using subprocess

For example, I want to call external command:
cat /tmp/fruits.txt | grep apple
, depending on if the input is trusted or not, we have the following two options:
  • For untrusted input:
    import subprocess
    
    cat = subprocess.popen(['/bin/cat', '/tmp/fruits.txt'], stdout=PIPE)
    grep = subprocess.popen(['/bin/grep', 'apple'], stdin=cat.stdout, stdout=PIPE)
    cat.stdout.close()
    output = grep.communicate()[0]
    print output
    
    
  • For trusted input, you can simply set shell=True:
    import subprocess
    
    output=subprocess.check_output('cat /tmp/fruits.txt | grep apple', shell=True)
    print output


海外看PPS/PPStream:修改配置文件解除区域限制

由于版权限制,有些节目比如TVB港剧,海外是看不到的。
下面的方法是通过修改配置文件,破除对海外的限制:
  1. 退出PPS
  2. 如果是Windows 7/Vista,进入文件夹 C:\Users\用户名\AppData\Roaming\PPStream;如果是Windows XP,进入C:\Windows
  3. 编辑并保存文件ppsarea.ini:
    [areainfo]
    servertime=1318520564
    localtime=1318520576
    country=4S4K3ZM3XU
    area=4WGY5ZFYTQ
    province=42YZ72ELR4
    city=4WGZPZF2VQ
    net=42KZT2ECWLT33EI
    ip=3526115369
            
  4. 编辑并保存文件psnetwork.ini:
    [areainfo]
    ret_code=200
    last_tick=1051906
    country=4S4K3ZM3XU
    area=4WGY5ZFYTQ
    province=42YZ72ELR4
    city=4WGZPZF2VQ
    net=42KZT2ECWLT33EI
    ip=692071634
    ut=1318520576
            
  5. 将上述两个文件设为只读(Read-Only).
  6. 启动PPS

See also

Embed fonts to PDF

  • Use preview (Mac)
    1. Open the PDF in the Preview.app
    2. Select File -> Print...
    3. Click the PDF button, and then select Save as PDF... from the pop up menu
    4. Choose a filename and save the file. The new PDF file contains the fonts required.
  • Use Adobe Reader X (or XI), See below:

Mac OS X Lion: save as PDF-X

  1. Open /Applications/Utilities/ColorSync.app, Select Filters, click the triangle to the right of the "Create Generic PDFX-3 Document" filter
  2. Select "Duplicate Filter"
  3. Open the new "Create Generic PDFX-3 Document Copy" filter, then "Domains", tick "PDF Workflows"
  4. Now when printing, you can click "PDF" button

    then select "Create Generic PDFX-3 Document Copy.qfilter" to create (or save as) PDFX-3 document.

Kindle 3 中文乱码的解决办法

I. 设置中文Locale

  1. 键回到初始页面,按回车键后,在输入框内依次输入以下三条命令:
    ;debugOn
    ~changeLocale zh-CN
    ;debugOff
    
    每次输入一条命令之后,按回车键确认输入。再按回车键输入下一条...
  2. 重启Kindle,具体步骤是, -> -> Settings -> -> Restart 或者按住滑动开关钮15秒就会重启。

II. 中文txt文档乱码问题的解决

必须先设置中文Locale,之后,应该可以正常显示中文书名,但是中文的txt格式文件,还是不能正常显示。解决办法是:
  1. 将txt文件转成Unicode或者UTF-8编码。这个办法对于比较短的txt文件有效。
  2. 对于长篇txt文件,即使转成unicode或者UTF-8,几页之后也会变成乱码。所以对txt文件最佳的办法就是用calibre转成MOBI格式。

III. 中文PDF文档空白或乱码问题的解决

原因是所需字体缺失,解决办法是嵌入所需字体重新生成PDF。具体办法是,使用Adobe XI (11.0)或者Adobe X(10.0)打开PDF文档,
  • 打开PDF文档后,选择打印到Adobe PDF (不要选打印机)
  • 打印选项设置(进打印后选择属性),然后在纸张/质量(Paper/Quality)里选择高级选项(Advanced),再选择下载软字体(Download as softfonts)
  • 开始打印后,生成的新PDF就是内嵌字体的了
如果PDF是被锁定的,无法打印。可以试试http://www.pdfunlock.com/解锁.

参考

Java RegEX: parse and extract dollar sign variables from string

Problem:

extract variables in the form of ${var} in string. e.g. "a ${b} ${c} ${b}", where b and c are variable names.

Solution:

import java.util.ArrayList;
import java.util.HashMap;
import java.util.List;
import java.util.Map;
import java.util.regex.Matcher;
import java.util.regex.Pattern;

public class QueryPattern {

 private String _s;
 private List<String> _vars;

 public QueryPattern(String s) {
  _s = s;
  _vars = parseVariables(s);
 }

 public List<String> variables() {
  return _vars;
 }

 @Override
 public String toString() {
  return _s;
 }

 public String evaluate(Map<String, String> varMap) throws Throwable {
  return evaluate(this, varMap);
 }

 public String evaluate(String[] vars) throws Throwable {
  return evaluate(this, vars);
 }

 public static void main(String[] args) throws Throwable {
  QueryPattern p = new QueryPattern("a \\\\\\${b} ${c}");
  System.out.println(p);
  System.out.println(p.evaluate(new String[] { "b", "1", "c", "2" }));
 }

 public static List<String> parseVariables(String s) {
  List<String> vars = new ArrayList<String>();
  Pattern p = Pattern.compile("\\$\\{[a-zA-Z]+\\w*\\}");
  Matcher m = p.matcher(s);
  while (m.find()) {
   int n = 0;
   for (int i = m.start()-1; i >= 0 && s.charAt(i) == '\\'; i--) {
    n++;
   }
   if (n % 2 != 0) {
    continue;
   }
   String var = s.substring(m.start() + 2, m.end() - 1);
   if (!vars.contains(var)) {
    vars.add(var);
   }
  }
  if (!vars.isEmpty()) {
   return vars;
  }
  return null;
 }

 public static String evaluate(QueryPattern pattern, Map<String, String> varMap) throws Throwable {
  List<String> vars = pattern.variables();
  String s = pattern.toString();
  if (vars == null) {
   return s;
  }
  for (String var : vars) {
   String value = varMap.get(var);
   if (value == null) {
    throw new Exception("Could not find value for variable: " + var);
   }
   s = s.replaceAll("\\$\\{" + var + "\\}", value);
  }
  return s;
 }

 public static String evaluate(String pattern, Map<String, String> varMap) throws Throwable {
  return evaluate(new QueryPattern(pattern), varMap);
 }

 public static String evaluate(QueryPattern pattern, String[] vars) throws Throwable {
  if (vars.length < 2 || vars.length % 2 != 0) {
   throw new Exception("Invalid length of array. Should be in the form of {\"name\", \"value\"}.");
  }
  Map<String, String> varMap = new HashMap<String, String>(vars.length / 2);
  for (int i = 0; i < vars.length; i += 2) {
   varMap.put(vars[i], vars[i + 1]);
  }
  return evaluate(pattern, varMap);
 }

 public static String evaluate(String pattern, String[] vars) throws Throwable {
  return evaluate(new QueryPattern(pattern), vars);
 }
}

FreeNX server authenticate failure: nxserver: (nx) Failed login for user=xxx

When setting up freenx server with --setup-nomachine-key option (it uses the default nomachine key pair come with the distribution.) The nx clients failed login with authentication error. And the /var/log/auth.log of the nx server host shows
nxserver[10411]: (nx) Failed login for user=wilson from IP=172.16.166.1
The reason is the nomachine key pair came with freenx distribution is no longer valid.

Solution:

The solution is: generate custom keypair and distribute the key to the nx clients:
  1. On the nx server host, remove the old ssh key pairs for the nx user:
    sudo rm /usr/NX/home/nx/.ssh
  2. On the nx server host, generate new custom key pair:
    sudo /usr/NX/bin/nxsetup --install
    When asking:
    Do you want to use your own custom KeyPair? [y/N]
    Answer is y. It will generate files (key pair) in /usr/NX/home/nx/.ssh/. And /usr/NX/home/nx/.ssh/client.id_dsa.key is the file you need to distribute to your nx clients.
  3. In the configuration of NX client (Nomachine nx client or OpenNX client), import the newly generate key file: /usr/NX/home/nx/.ssh/client.id_dsa.key
  4. Now you should be able to login via nx client...

Mac OS X: how to change file association

  • Right click on the file you want to change the association for and select "Get Info"
  • Change "Opens With" to the application you want.
  • Click the "Change All..." button to change this file association for all files of the same type.

    And click "Continue" button when the confirmation message is prompted:

Mac OS X: check file association information

The user's file association settings is stored in ~/Library/Preferences/com.apple.LaunchServices.plist. However, it is not a text file. You need to run the following commands to see the information:
defaults read com.apple.LaunchServices | grep -v LSBundleLocator
or
/System/Library/Frameworks/CoreServices.framework/Frameworks/LaunchServices.framework/Versions/Current/Support/lsregister -dump

See also:

Mac OS X: Remove duplicated "Open with" menu items by rebuilding LaunchServices database

The "Open with" menu may contain duplicated items when you upgrade the application to a new version. For example, I upgraded my Firefox.app from 10 to 11, then 12. The Open With menu then contains three duplicated Firefox.app items. To clean them up, you can rebuild the LaunchServices database:

  • On Mac OS X 10.5 or later (Leopard, Snow Leopard, Lion or Mountain Lion), run the following command:
    /System/Library/Frameworks/CoreServices.framework/Frameworks/LaunchServices.framework/Support/lsregister -kill -r -domain local -domain system -domain user
    
  • On Mac OS X 10.3 or 10.4 (Panther or Tiger), run the following command:
  • /System/Library/Frameworks/ApplicationServices.framework/\Frameworks/LaunchServices.framework/Support/lsregister -kill -r -domain local -domain system -domain user
    

Mac OS X: find duplicated files using DupeGuru

  1. Download and install DupeGuru.
  2. Add the folders you want to scan for duplicates.
  3. You can mark the duplicates found and send them to Trash.

GWT Developer's Plugin for Firefox 16

  1. Click the link below:
    http://google-web-toolkit.googlecode.com/svn-history/trunk/plugins/xpcom/prebuilt/gwt-dev-plugin.xpi
  2. Open it with Firefox

See also

Mac OS X: Bypass the confirmation message when turning on private browsing in Safari

When turning on "Private Browsing" in Safari, it always pops up a confirmation window:


It is annoying. To avoid the confirmation message, you have two options:
  • Option 1: Hold Option key, when click "Private Browsing..." menu item
  • Option 2: Add keyboard shortcut:
    1. "System Preferences..." -> "Keyboard"
    2. Activate "Keyboard Shortcuts" tab, select "Application Shortcuts", then click + button
    3. Application: Safari.app, Menu Title: Private Browsing, Keyboard Shortcut: Ctrl+Option+P, then click Add button. You can now using the key combo (shortcut) to turn on "Private browsing" mode without seeing the confirmation message.

Mac OS X: add keychain item manually

  1. Open "Keychain Access" in "/Applications/Utilities/Keychain Access.app"
  2. File -> "New Password Item..."

Mac OS X: back up your keychain files

Your keychain files are located at ~/Library/Keychains/. You can back them up by making copies of them. e.g.

tar czvf keychains.tar.gz ~/Library/Keychains/*; cp keychains.tar.gz /Volumes/USB/

Eclipse: Indent using spaces instead of tabs

  • The default text editor: Preferences->General->Editors->Text Editors->Insert spaces for tabs
  • The Java editor: Preferences->Java->Code Style->Formatter->Edit->Indentation = "Spaces Only"

Mac OS: Show WIFI password

  1. Open "Keychain Access", go to Applications -> Utilities -> Keychain Access
  2. Keychains: System, Category: Passwords, Select the wireless network, double click to open it.
  3. In the pop-up window, tick "Show password", you will be asked for your login & password, enter them correctly, you can then see the wifi password.

Linux: schedule a delayed shutdown

  • Shutdown at 20:00:
    nohup shutdown -h -P 20:00 &
  • Shutdown in 60minutes:
    nohup shutdown -h -P +60 &

Android: force apps to install to SD card without root

The android apps can be installed/moved to sd card if the application supports it. However, not all the applications support this. And the default install location for the apps is internal storage which is most likely insufficient. The following approach can change the default install location for the apps to sd card (external storage). which means the all the apps will be installed to sd card. (and it does not require rooting the phone):
  1. Install android sdk and connect your phone to your computer.
  2. Run the following adb commands:
    cd /path/to/android-sdk-macosx/platform-tools
    ./adb devices
    ./adb shell pm getInstallLocation
    ./adb shell pm setInstallLocation 2
    
  3. To check the install location:
    ./adb shell pm getInstallLocation
    
    it should return
    2[external]
    

Note

In Android, Install Location has 3 values:
  • 0[auto] – Let the system decide the best location
  • 1[internal] – Install the application on internal device storage. This means any internal storage provided with your device
  • 2[external] – Install the application on external media. This means any SD, microSD cards attached to your device.
The default value is 0[auto]. You can revert back to the default using the following adb command:
./adb shell pm setInstallLocation 0
On Windows, you might need to install the USB driver to connect your phone to your computer to run the adb commands.

See also

Citrix XenServer: failed to start Ubuntu VM after kernel upgrade

Recently I upgraded my Ubuntu VM to 12.04, which includes the new kernel. However the VM failed to reboot with following error:
Using  to parse /boot/grub/grub.cfg

To fix it,
  1. boot your vm using the following command:
     xe-edit-bootloader -n your_vm_name -p 1
  2. edit /grub/grub.cfg, comment out or remove the whole submenu section.
To avoid this, always remove the old kernels before rebooting. It automatically removes the submenu form grub.cfg. e.g.
aptitude remove linux-image-2.6.38-8-virtual

See also

TCL: for loop with multiple variables

TCL for loop is in the form of
for { init } { test } { next } { body }
. The examples below shows for loops with more than one variables:
  1. Example 1:
    for { set i 0; set j 10 } { $i < $j } { incr i; incr j -1 } {
       puts "$i $j"
    }
    
    Output:
    0 10
    1 9
    2 8
    3 7
    4 6
    
  2. Example 2:
    for { set i 0; set j 10 } { $i < 3 && $j < 7 } { incr i; incr j -1 } {
       puts "$i $j"
    }
    
    Output:
    0 10
    1 9
    2 8
    

connect to your android phone using adb on Mac OS X

  1. Download and install Android SDK. adb (Android Debugging Bridge) is located at platform-tools/ directory.
  2. Connect to your android phone using adb.
    1. On your android phone, turn on USB debugging: Settings -> Applications -> Development -> USB Debugging
    2. Connect the phone to your Mac using the USB cable.
  3. Now you can run following adb commands to connect to your phone:
    /opt/android-sdk-macosx/platform-tools/adb devices
    It should return something like below:
    $ /opt/android-sdk-macosx/platform-tools/adb devices
    * daemon not running. starting it now on port 5037 *
    * daemon started successfully *
    List of devices attached 
    352810040135572 device
    
  4. You then using adb commands on your android device, e.g. adb shell to browse the phone's file system.
    /opt/android-sdk-macosx/platform-tools/adb -s 352810040135572 shell
  5. More detail about adb commands.
  6. NOTE: remember to turn off USB debugging on your phone.

See Also

Android: configure CSIPSimple with pennytel

To install and configure CSipSimple with Penneytel:

  • Accounts -> Add account
    • Select Other country providers then Pennytel
    • User Name: 888XXXXXXX (10 digits pennytel number)
    • Password: Your_Pennytel_VoIP_Password
    • Click Save button
  • Settings -> Media -> Codecs, enable only g729 codec and disable all the others.

NOTE:

  • To find your pennytel VoIP password, login to pennytel portal, click "Personal VoIP" in the left sidebar, activate "Settings" tab then "VoIP Settings" sub-tab, then click the + icon near "SIP Settings" in the right column.

See also:

Install apk files into Android emulator using adb (android sdk)

  1. Install the Android SDK
  2. Start the emulator:
    /path/to/android-sdk-macosx/tools/emulator -avd
    and make sure you have tick "Setting -> Applications -> Unknown sources"
  3. Install the apk file:
    /path/to/android-sdk-macosx/platform-tools/adb install /path/to/the-app.apk

Android: configure 3CX softphone with Pennytel

To install and configure 3CX Phone to work with Penneytel:
Profiles -> Add New
  • Account:
    • Name: pennytel
    • Display Name: pennytel
  • Credentials:
    • User: 888XXXXXXX (your 10 digits pennytel number)
    • ID: 888XXXXXXX (your 10 digits pennytel number)
    • Password: Your_Pennytel_VoIP_Password
  • Server Settings:
    • I am Out of Office: (DO NOT tick)
    • Local PBX IP: sip.pennytel.com
    • External PBX IP: sip.pennytel.com
    • PBX port: 5060
    • STUN Server: (empty)
    • 3CX Tunnel: (DO NOT use/change)
    • Proxy: sip.pennytel.com
  • Audio Settings:
    • Audio options: NO CHANGE
    • Audio codecs: NO CHANGE
  • Other Settings:
    • Advanced: NO CHANGE
    • Integration: NO CHANGE

NOTE:

  • To find your pennytel VoIP password, login to pennytel portal, click "Personal VoIP" in the left sidebar, activate "Settings" tab then "VoIP Settings" sub-tab, then click the + icon near "SIP Settings" in the right column.

See also:

Show/Hide http:// prefix in Firefox

  1. Type “about:config “ in the address bar and press enter. Then proceed by clicking "I'll be careful, I promise!" button.
  2. Search for browser.urlbar.trimURLs preference and double-click it to set its value to false.

Free DNS services

Shell Script: Check if a string contains a substring

#!/bin/bash

S="Pineapple"

if [[ "${S}" == *apple* ]]; then
    echo "Yes"
else
    echo "No"
fi

blogger: label search url

  • To search for the posts with label: "YourLabel":
        http://YourBlog.blogspot.com/search/label/YourLabel
    
  • For the labels contains blank space, e.g "Your Label", use %20 replace the space:
        http://YourBlog.blogspot.com/search/label/Your%20Label
    
  • To search for posts with multiple labels, e.g. Label1 and Label2:
        http://YourBlog.blogspot.com/search?q=label:Label1+label:Label2
    

Tips

  • You can use the label search urls as Top Tabs to categorize your posts.

Mac OS X Lion: Install alarm clock widget

Mac OS X: extract files from .pkg installer packages

  • To list the contents of the .pkg:
    gunzip  -c /path/to/XXX.pkg/Contents/Archive.pax.gz | pax
    
    For example:
    gunzip  -c /Volumes/iMac\ EFI\ Updater/iMacFirmwareUpdate.pkg/Contents/Archive.pax.gz | pax
    
  • To extract a specific file from the .pkg:
    gunzip -c /path/to/XXX.pkg/Contents/Archive.pax.gz | pax -r -s ":old-path:new-path:" "old-path-to-file"
    
    For example, I want to extract LOCKED_IM61_0093_07B.fd from the package. First, I need to find its full path inside the package using the following command:
    $ gunzip  -c /Volumes/iMac\ EFI\ Updater/iMacFirmwareUpdate.pkg/Contents/Archive.pax.gz | pax | grep LOCKED_IM61_0093_07B.fd
    ./Applications/Utilities/iMac EFI Firmware Update.app/Contents/Resources/LOCKED_IM61_0093_07B.fd
    
    then I can run the following command to extract it from the package to the current directory:
    gunzip  -c /Volumes/iMac\ EFI\ Updater/iMacFirmwareUpdate.pkg/Contents/Archive.pax.gz | pax -r -s ":./Applications/Utilities/iMac EFI Firmware Update.app/Contents/Resources:.:" "./Applications/Utilities/iMac EFI Firmware Update.app/Contents/Resources/LOCKED_IM61_0093_07B.fd"
    

Mac OS X: mount or unmount .dmg image from command line

  • To mount a .dmg image in command line, run the following command in Terminal:
    hdiutil mount ~/Downloads/jdk-7u4-macosx-x64.dmg
    
    You will see something like below:
    $ hdiutil mount ~/Downloads/jdk-7u4-macosx-x64.dmg 
    expected   CRC32 $75F74818
    /dev/disk3           GUID_partition_scheme           
    /dev/disk3s1         Apple_HFS                       /Volumes/Oracle JDK 1.7.0_04
    
    It is mounted to "/Volumes/Oracle JDK 1.7.0_04"
  • To unmount it, run the following command in Terminal:
    hdiutil unmount "/Volumes/Oracle JDK 1.7.0_04"
    

明,清,民国对日宣战书见证国家兴衰

明朝平倭诏书

诏曰:
朕缵承洪绪,统理兆人,海澨山陬,皆我赤子,苟非元恶,普欲包荒。属者东夷小丑平秀吉,猥以下隶,敢发难端,窃据商封,役属诸岛。遂兴荐食之志,窥我内附之邦,伊歧对马之间,鲸鲵四起,乐浪玄菟之境,锋镝交加,君臣逋亡,人民离散,驰章告急,请兵往援。

朕念朝鲜,世称恭顺,适遭困厄,岂宜坐视,若使弱者不扶,谁其怀德,强者逃罚,谁其畏威。况东方为肩臂之藩,则此贼亦门庭之寇,遏沮定乱,在予一人。于是少命偏师,第加薄伐。平壤一战,已褫骄魂,而贼负固,多端阳顺阴逆,求本伺影,故作乞怜。册使未还,凶威复扇。朕洞知狡状,独断于心。乃发郡国羽林之材,无吝金钱勇爵之赏,必尽弁服,用澄海波。

仰赖天地鸿庥,宗社阴骘,神降之罚,贼殒其魁,而王师水陆并驱,正奇互用,爰分四路,并协一心,焚其刍粮,薄其巢穴。外援悉断,内计无之。于是同恶就歼,群酋宵遁,舳舻付于烈火,海水沸腾,戈甲积于高山,氛浸净扫,虽百年侨居之寇,举一旦荡涤靡遗。鸿雁来归,箕子之提封如故,熊罴振旅,汉家之德威播闻,除所获首功,封为京观,仍槛致平正秀等六十一人,弃尸稿街,传首天下,永垂凶逆之鉴戒,大泄神人之愤心。

于戏,我国家仁恩浩荡,恭顺者无困不援;义武奋扬,跳梁者虽强必戳。兹用布告天下,昭示四夷,明予非得已之心,识予不敢赦之意。毋越厥志而干显罚,各守分义以享太平。

凡我文武内外大小臣工,尚宜洁自爱民,奉公体国,以消萌衅,以导祯祥。更念彤力殚财,为日已久,嘉与休息,正惟此时,诸因东征加派钱粮,一切尽令所司除豁,务为存抚,勿事烦苛,咨尔多方,宜悉朕意。
万历二十七年闰四月丙戌,以平倭诏告天下。

清对日宣战书


朝鲜为我大清藩属,二百余年,岁修职贡,为中外所共知。近十数年,该国时多内乱,朝廷字小为怀,叠次派兵前往戢定,并派员驻扎该国都城,随时保护。本年四月间,朝鲜又有土匪变乱,该国王请兵援剿,情词迫切,当即谕令李鸿章拨兵赴援,甫抵牙山,匪徒星散。乃倭人无故派兵,突入汉城,嗣又增兵万余,迫令朝鲜更改国政,种种要挟,难以理喻。我朝抚绥藩服,其国内政事向令自理.日本与朝鲜立约,系属与国,更无以重兵欺压强令革政之理.各国公论,皆以日本师出无名,不合情理,劝令撤兵,和平商办.乃竟悍然不顾,迄无成说,反更陆续添兵.朝鲜百姓及中国商民,日加惊扰,是以添兵前往保护。讵行至中途,突有倭船多只,乘我不备,在牙山口外海面,开炮轰击,伤我运船。变诈情形,殊非意料所及。该国不遵条约,不守公法,任意鸱张,专行诡计,衅开自彼,公论昭然。用特布告天下,俾晓然于朝廷办理此事,实以仁至义尽,而倭人渝盟寻衅,无理已极,势难再以姑容。著李鸿章严饬派出各军,迅速进剿,厚集雄师,陆续进发,以拯韩民于涂炭。并著沿江沿海各将军督抚及统兵大臣,整饬戎行,遇有倭人轮船驶入各口,即行迎头痛击,悉数歼除,毋得稍有退缩,致干罪戾。将此通谕知之,钦此。

民国对日宣战书


日本军阀夙以征服亚洲、独霸太平洋为其国策国策。数年以来,中国不顾一切牺牲,继续抗战,其目的不仅所以保卫中国之独立生存,实欲打破日本侵略野心,维护国际公法、正义以及人类福利与世界和平。此中国屡经声明者。

中国为酷爱和平之民族,过去四年与之神圣抗战,原期侵略者之日本于遭受实际之惩创后,能反省。在此时各友邦亦极端忍耐,冀其悔祸,陴全太平洋之和平得以维持。不料残暴成性之日本,执迷不悟,且更悍然向我英美友邦开衅,扩大其战争侵略行为行动,甘为破坏全人类和平与正义之戎首,逞其侵略无厌职野心。举凡尊重信义之国家,咸属忍无可忍。兹特正式对日宣战,昭告中外,所有一切条约协定合同有涉及中日之间关系者,一律废止。特此有告。
:1931年9.18事变,日本占领东北三省。1937年7.7事变,日本全面侵华。1937年12月,日军南京大屠杀。而国民政府却直到1941年日军突袭珍珠港,太平洋战争全面爆发之后,才发此对日宣战书,正式对日宣战。

Proxy auto configuration example: proxy.pac

function FindProxyForURL(url, host) {
 if(isInNet(host, "198.168.0.0", "255.255.0.0") || 
    isInNet(host, "172.23.65.0", "255.255.255.0") || 
    isInNet(host, "127.0.0.0", "255.255.255.0") {
  return "DIRECT";
 } else {
  return "PROXY wwwproxy1.yourorg.org:3128; PROXY wwwproxy2.yourorg.org:3128; DIRECT";
 }
}

Shell script: arithmetic float point


  # 2/3
  echo "2/3" | bc -l


  # 0.67
  printf "%3.2f" $(echo "2/3" | bc -l)

SyntaxHighlighter on Blogger: how to enable border

Add the following style to your blog template, right after the SyntaxHighlighter css link:
<style type='text/css'>
    body .syntaxhighlighter {
        border: 1px dashed #808080;
        -webkit-border-radius: 3px;
        -moz-border-radius: 3px;
        -ms-border-radius: 3px;
        -o-border-radius: 3px;
        border-radius: 3px;
        max-height: 600px;
        overflow: auto;
        padding: 1px 1px 2px 2px;
    }
</style>

See also

Mac OS X Lion: Fix corrupt Mail folder

On Mac OS X Lion, it happened to me that the mail settings or messages were missing. Checked ~/Library/Mail folder, the messages are still there but I could not see them in Mac Mail. The solution for this is:
  • Quit your Mac Mail
  • Backup Mail folder:
    cp -r ~/Library/Mail /tmp/
    
  • Remove Envelope Index file:
    rm ~/Library/Mail/Envelope\ Index
    
  • Open Mac Mail application, it will import the messages automatically
  • Quit Mac Mail after import, then re-launch Mac Mail, you will see all the messages
  • Remove the backup if everything is ok:
    rm -fr /tmp/Mail
    

css: font families for programming (code)

.code, .pre {
   font-family: Terminus,Consolas,Profont,"Andale Mono",Monaco,Inconsolata,Inconsolata-g,
      Unifont,Lime,"ClearlyU PUA",Clean,"DejaVu Sans Mono","Lucida Console",
      "Bitstream Vera Sans Mono",Freemono,"Liberation Mono",Dina,Anka,Droid Sans Mono,
      Anonymous Pro,Proggy fonts,Envy Code R,Gamow,Courier,"Courier New",Terminal,monospace;
}

javascript: make base64 encoded string url friendly

based64 encoded string contains some characters that are not valid to be urls. The following javascript functions can be used to make a url safe string from a base64 encoded string.
function encodeURL(str){
    return str.replace(/\+/g, '-').replace(/\//g, '_').replace(/\=+$/, '');
}

function decodeUrl(str){
    str = (str + '===').slice(0, str.length + (str.length % 4));
    return str.replace(/-/g, '+').replace(/_/g, '/');
}

See also

Javascript: collapsable div


Source Code

<script type="text/javascript">
function update(){
    var button = document.getElementById("button1");
    var div = document.getElementById("div1");
    var action = button.value;
    if(action=="Show"){
        div.style.display='block';
        button.value = "Hide";
    } else if(action=="Hide"){
        div.style.display='none';
        button.value = "Show";
    }
}
</script>
<input id="button1" type="button" value="Show" onClick="update();"/><br/>
<div id="div1" style="background-color:#e0e0e0;display:none;">
Hi, there.<br/><br/><br/><br/><br/>
</div>

Javascript: base64 encoding and decoding

  • Method 1: use atob() and btoa() methods on Mozilla/Webkit based browsers.
  • Method 2: use the following javascript library:
  • Method 3: use jquery and jquery base 64 plugin.

See also